The things you find in an old home...

Liz had a dream recently that while cleaning out the garage we found a box of very old collectibles. In the dream she was describing the items to our new neighbor (our real life neighbor who is actually the original owner of her Cliff May home ), and the neighbor explains to Liz that these "items" are incredibly valuable, worth upwards of a million + dollars. Unfortunately that was just a dream and my actual found "treasures" are not quote 'as valuable', but still interesting and entertaining nonetheless so I thought I'd share.

First find, photos stashed away by the second owners from October 1965.
These are four of the better shots from the 10 we found...


The actual photos are in amazing condition and I came up with an idea to try and duplicate each shot once the house is finished for a great before and after compilation.

The second find comes from a date about 10 years from the time the house photos were taken. I still can't decide whether these should be rated "PG13" or "R"...but I did my best to censor them myself.

Second find, vintage adult magazines circa Summer of 1975.
Here's a couple scans from two of the covers in better condition...


So while I'd like to say that I'm enjoying flipping through the pages of these magazines for the articles, I have to be honest with you...after all, I am a man, and everyone knows what men really enjoy looking at...

...cars and electronics of course. What were you thinking???


...and here's a great ad for a Motocross race from WAY back in the day...


These probably won't be framed and hung on the wall like the photos of the home, but I am going to put them right back on top of the closet when we finish the re-modern of the bedroom and office. Who knows...many, many years from now the next owner of this house could be blogging (or whatever they decide to call it in the future) about the ancient (not vintage) adult magazine they found while re-futurizing their first Cliff May home.

Happy Monday,

Gary - - - -

Sunday evening un-wind

Liz and I just returned from a bachelor/bachelorette weekend in Vegas. No, not our own, but one for a best friend of mine that recently decided to fall in love and run away to Colorado. As much as I miss having him close by, I couldn't be more happy that he found such an amazing woman, and now the questions of his sexuality can finally be put to rest.
(insert "wink" emoticon here...only kidding Klapp!)

While it felt like it never dropped below triple digit temperatures it was a great weekend and a brief escape from the long list of chores and jobs around the new house. I am definitely a fan of Las Vegas and especially enjoy gathering design inspiration from the abundant hotel, restaurant, and club decors. Definitely not "small space" friendly design, but the combination of materials, colors, and textures is something I want to pay as much attention to as possible. Many of you already know this, but if I didn't already have a fulfilling career in the automotive industry I would go back to school and pursue a more creative career in design, but for now I'll just focus my energies on the necessities around the house and on the new furniture business (I'll share more about that another time).

So, the Friday before we left to Vegas was our last day moving the remainder of our life's belongings from the rental house to the new house. This place is surely lacking in the storage department, but I finally have a garage for the first time in my life, and can now gauge how much more functional storage room we will need before we get to far along in our re-modern. I'm currently sitting in the only room not completely full of moving boxes, misplaced furniture, tools, and painting supplies so I thought it would be a great time to unwind from the weekend and share a couple photos of last weeks progress...

Changed all the keyed locks around the house.


Prepped and painted ALL of the ceilings, including every last bit of black trim around the entire house.
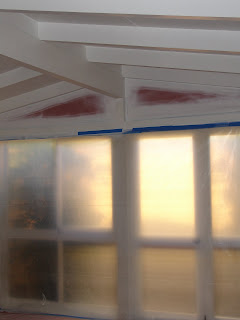


As you can see the black trim needed multiple coats and these photos were taken between the 1st and 2nd coats. We have 3 coats in total and I still have some misc. touch up here and there.

Here's a pretty decent "before and after" view...
(before)


(after)


While I can say that I didn't completely hate the contrast with the black trim, I think that once we get some accent colors on the larger solid walls it will be a fresh look and visually "open" the space. The black trim really tied together all the walls and seemed to "shrink" the space for me.

One project I didn't get a change to photograph was the swapping of a set of window panes from end of the house to the other. I'll explain that project after these next couple photo's of the demolition of the entire kitchen and wall separating the kitchen and living room.

Yup, I said demo. While we are not quite prepared to fully re-modern the entire kitchen...cabinets/counters/appliances/floors, I made an executive decision to do all the demo before moving in. My thinking (and I'm really hoping that it was the right decision) was that even though this step leaves us without a functional kitchen for a while, it would mean that all the "dirty" work would be out of the way before we start living in the house. After that it only leaves the rebuilding phase which is much less invasive and messy. We've been told that one of the worst parts of remodeling or renovating a home that you live in is the mess and disarray while you're trying to live. Here's what we were able to get done in a 3 day period, all with a claw hammer and 16" pry bar nonetheless...

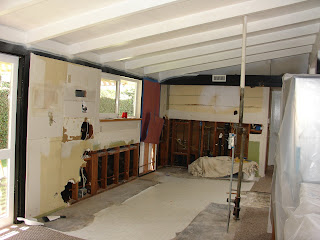


Taking a look into the far back corner of the kitchen, you can see where we decided to frame in the rear entry door in favor of more counter space, and a more functional 'L' shaped layout. This helps to explain the swapping of the window panes that I mentioned earlier. The swap was to take the glass side entry doors, and install them in place of the sliding windows at the rear of the dining room. This would function as our new rear entry door and allow us access into the back yard which will eventually become Liz's vegetable garden. Surprisingly, it was a much simpler job than had been anticipated and it only took a few hours (less the time for painting and trim work) to finish. I'll try and post photos (probably) tomorrow of this swap.

The decision to tear down the dividing wall between the kitchen and living room is to create space for a large island that will house the sink, dishwasher, wine cooler, and built-in microwave. The brilliant part of this was that the drain and plumbing to return the sink to the center of the kitchen area was still intact. The two structural beams that divide the kitchen and living room area will be "re-moderned" with privacy glass, very similar to the original Mistlite.

It's been a pretty busy week and a half and it's only going to get more interesting now that we are moved in. This week will be all about finding space for all of our belongings and making a final plan and time line for finishing the kitchen and living areas. I'll keep these pages in the loop and update some more photos along the way.

I'm out to catch up on some of that sleep I missed out on all weekend.

Gary - - - -

Photos

From the day we took the keys:


360 view of the living/dining/kitchen...

(1)


(2)


(3)


(4)


(5)


Down the short hallway from the kitchen...

(6)


There's a guest bathroom on the left that I intentionally didn't take pictures of. Just picture a blue toilet, blue tub, and a sink/vanity from a Barstow Motel.

The end of the short hall brings us to what should have been 2 rooms, converted to one large room. Starting from left to right...

(7)

This will eventually be my office with a daybed/guest bed.

(8)

More Glass.

(9)

This will eventually be the kids room.

What should be 2 rooms was converted to 1 large room, BUT, with an added option to separate the rooms again. Check out this great accordion style room divider...

(10)


(11)


Ok, so back out of these two rooms and into the living room, you enter the master bedroom from the opposite side (from the fireplace) of the front door...

(12)


(13)


(14)


It's hard to gauge the size of a room, especially without a wide angle lens, but the master is actually a decent size. Not large by any means, but its fits my cal-king size bed with 2 side tables and still has enough room on the other end for a reading chair and end table.

I numbered each photo above for reference as I make comments about each room.

In photo's (4) and (5) you can see the stepped wall that divides the kitchen from the living area. That is coming out of there with a quickness. I think it's cramps the space and make it almost claustrophobic.

In EVERY photo you can see the color scheme of the house was a creme color with gloss black accents on the vertical beams and main structural beam through the house. The ENTIRE ceiling and anything else that is now black will eventually be painted ULTRA White - semi gloss. I love the idea of a bright white ceiling to enlarge the room. That color will be brought down the walls along the beams as well. The remaining solid (drywall) walls will all get accent colors with the exception of the dining room wall seen in photo (3)...that will get a burst of color and texture with a wall covering, most likely a wall paper or 3D wall tiles/paintable wall flats.

Aside from tearing out that interior wall between the kitchen and living room, the rest of the house will remain functionally as shown in the photos. The accordion wall divider will be traded for a solidly mounted divider, possibly the original design with the closet dividing the two rooms, or a type of "sound wall" surrounded by privacy glass. Imagine a wall that appears to be floating in the middle of the room.

That's all for now.
I'll post photos of the demo, and of the first few coats of paint soon. There will probably be some furniture in the rooms by then to ass some scale, and because we have to be out of our rental by the end of this month.

Fun Fun Fun!

Gary - - - -

This is it!

If you've found this blog you're either interested in Cliff May, Mid Century Modern homes, or are a friend or family member that I've recently sent this link to. In any case, thanks for stopping by and I hope you enjoy what you see as well as what is soon to follow.

The future of this blog will follow the Re-Modernization of our first home, this Cliff May Rancho in the wonderful Lakewood Rancho Estates.


If you're not familiar with the area this neighborhood borders the enormous 388 acres of El Dorado Park, just west of the 605 fwy. and about 5 minutes from the 405 fwy.


The neighborhood of nearly 700 homes was built in the early 1950's by designer Cliff May who is responsible for pioneering the Californian Ranch House. Each home is an expression of then modern design, blending the living area from the outdoors in. It's not uncommon for each room to have a generous view of the surrounding property with walls of floor to ceiling glass.

Our home was partially "updated" (if one were to call it that) but still left very much in its original form. Our plan is to bring it to a new life by combining modern amenities without distracting from Cliff May's original vision. I'd like to think that had he designed these homes today, he to would take advantage of many new materials, technologies, and available resources to blend into his own Rancho designs.

Re-Modern is my way of describing our intention with this wonderful home and the following posts will highlight many of our steps along the way. For now, enjoy the photos of the home as we found it, a few of our start of the renovation, and some insight to our plans and ideas. We welcome your ideas and thoughts as well, so comment away!

See you here again soon,


Gary - - - -