Wow. It's hard to believe it's been just over a year since my last post. In my head it seems like just last month that we took the keys, began tearing down walls, and simultaneously started filling empty space with furniture. But if I take the time to reflect on individual happenings over the last twelve months, it does paint a more vivid picture of a full year gone by, and there's a fair amount of progress to prove it.

Not knowing exactly where to start, a quick summary might look like this:

We got a puppy...


I started installing the floors...


Liz and I celebrated an anniversary...


I built a proper wall between the two back bedrooms...

(before)


(during)


(after)


(opposite side - after)


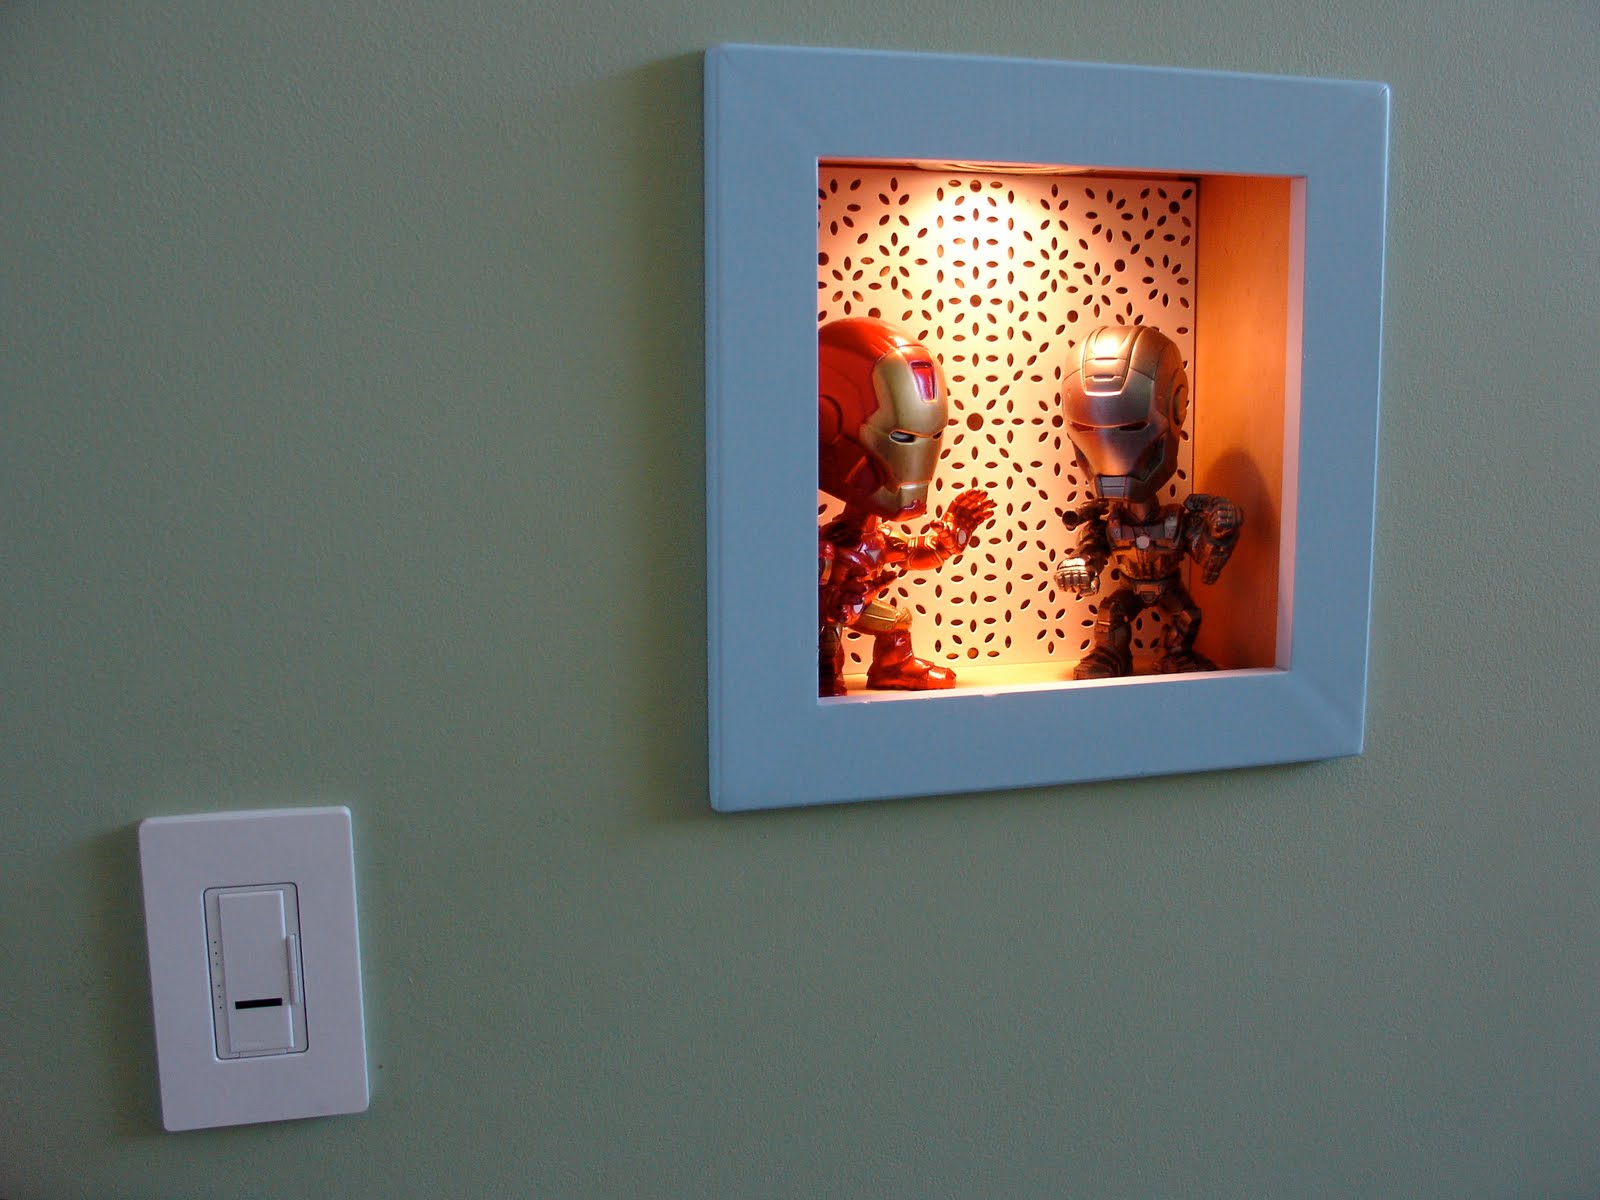
I was insistent on utilizing some original mistlight glass to divide the two rooms in a similar manner to how it originally surrounded the"Jack n' Jill" closet.

(another "before")


(another during)


(and another after)


The wall is wired with electrical outlets, ethernet, and cable.
I even went as far as installing a dimmer to control the light boxes in the kids room that's in sink with the overhead lighting.


Next, I started on the design for the new kitchen and ordered all of the base and island cabinets. I also found a counter top material I really liked, and finalized a design for the full kitchen layout...

Some of you reading this may know that the kitchen has been a painfully long term project for us based on having "caviar taste and a tuna fish budget" (if that's how that saying actually goes). Deciding that we only were only going to be able to do this once, we felt that we might as well do it in baby steps and get exactly what we want the first time around. To make a long story long, we've gone approximately the full year with no kitchen sink.

As of today we have a fully functional, but only 75% completed kitchen.
The following images were shot on my BlackBerry (nicer photos coming soon).

Here's the kitchen island complete with sink, faucet, garbage disposal, dishwasher, and all electrical and plumbing finished.


And most recently (like as of last week), Liz and I agreed on a couple items for the dining room in the form of a new table, chairs, and lamp...


The green/white/grey will be the color scheme throughout the living room, dining room and kitchen.
I decided to go with Modernica for the chairs after I searched for months online trying to find original Eames side chairs for our table. The choice of Modernica vs. DRW was esentially based on deciding non-authorized replicas constructed in a more authentic manner, or authorized reproductions in injection molded plastic rather than the original fiberglass. I love the look and feel of the fiberglass and felt it was a great compromise to sourcing vintage original pieces.

So that would be the just of it for now. There's a ton of more work to be done such as two new frosted glass doors for the back office and kids room, which will officially become the first two completed sections of the entire house. Future plans beyond that call for finishing the kitchen (upper cabinets, and the rest of the counter tops around the room), then into a full remodel of the the master bath in our bedroom, followed by the same to the main bathroom in the hallway. I have no doubt we still have a couple years worth of work before I would consider the interior of the home finished, and hopefully I won't let that entire period lapse without more frequent updates for you guys to follow along with.

Oh, and one last thing.
"Ace" has grown up quite a bit since the first photo...


Hope everyone is enjoying their Summer as we are!
See you back here again, sooner than later.

Progress Report

So it's been two weeks since my last post and it feels good to say that there has been some progress around the house. We have internet and television, which affords me the functional home office, and the occasional vice of reality TV.

Quick note: If you have the option for Verizon FiOS in your area, it comes highly recommended. Working from home definitely makes you either appreciate great internet service or curse it at every slow upload and download, or in my case with a Voice Over IP work phone, every choppy or echoed business call.

The progress over the last 2 weeks has allowed me and Liz to make the house somewhat presentable for weekend house guests from Oregon. While it is starting to feel slightly more like a home than the construction zone it has been for the last month and a half, I need to stay focused and continue to get projects done, as I would say we are less than 10% of the way through my to-do list.


Progress Report Card

Painting: B-
Comments: There is color on the walls, but there needs to be more effort put towards the final detail and finish work. An up-close and personal view of nearly every post and beam in this house brings to light the fact that they definitely did not use the best quality materials for the construction of these houses, and understandably so since these homes were meant to be "affordable modern homes" for the time period. Still, I can't help but be frustrated with the amount of splintered and knotty wood that I can't help but want to smooth out and even up as I paint past them.
Details: Olympic Premium Zero VOC Interior Paint.
-"Winters Day" (light grey), eggshell, for the master bedroom and office.


-"Quaking Grass", (green) eggshell, for the kids room.

-"Dover Grey", (dark grey) semi-gloss, for the fireplace and living room accents.


Ceiling Fan Installation: C+
Comments: We definitely needed a way to move air in the master bedroom and this was not a horrible solution for under $150 and 45 minutes of work. Still, I wouldn't feel good about giving myself on higher grade on this project considering (1) I'm not a "fan" of ceiling fans (I don't even know if that could be considered a pun), and (2) I'm never happy having to run electrical on the outside of a wall or beam (you'll see more of this fanaticism further in this post).
Photo:


Electrical/Wiring for Audio/Video: B+
Comments:
I'm not sure if this issue is exclusive to my particular home or floor plan, but the fireplace and entry wall had no electrical at all for lighting or wall plugs. While I know it's uber common and over played a bit, I really wanted the television over the fireplace. It took weeks alone just to settle on an approach to getting the necessary power supply, with video and audio cable, to the general area. I'd like to give myself an A+ for concept and creativity. The B+ is completely dependent upon me completing the finish work to an acceptable level through the entire project. Everything is functional at this point but I still have about 25 linear feet worth of spackling, sanding, and painting left.
Details:
1/2" x 1/2" square trim with 1/4" x 31/2" & 1/4" x 51/2" face panels.
I made a path for the cables by bordering the existing frame work and beams with the square trim to create a sort of "channel" for the cables to run through. The 1/4" facing completely covers the cables and trim to match the exact widths and thicknesses of the beams. After they are puttied, sanded, and painted, my hope is that they blend completely as part of the original structure.
Photos:


Temporary Kitchen Shelving: C-
Comments: IKEA to the rescue! Yes it's temporary, but I still felt that it needed to be graded. In order to make the place presentable for house guests we needed to unpack a few more boxes, the remaining boxes being mostly kitchen products. If only real cabinetry were this cheap,... the entire supply of Gorm shelving was less than $125 + some creative time to figure out what I wanted to accomplish.
Photos:


Final Thoughts: If the kitchen is the heart of the home, we are definitely still on life support. The good news is that we are finally stable and out of ICU, the superficial wounds are tended to and now it's just a matter of taking the proper time to heal. Over the next few weeks I'll be working on the finishing touches around the last few projects. I really believe that the quality is in the details and while I rushed to get everything to a point of functionality, I have no problem taking my time from this point on.

With nothing on the radar that's a necessity at this point, it's back to the mental re-modern until we get to the point of starting the kitchen. Be sure to check back as I'll be sharing a variety of my inspirational images and ideas as Liz and I make a final plan of attack on the kitchen.

Gary - - - -


The Decision Game

Starting from scratch when rebuilding an entire room is much harder than I imagined.

In my head I believed I had this place designed from the floor to the ceiling. In reality, making a decision is much more difficult than the "point and click" approach I took to gathering ideas. The wonderful web world gives you nearly infinite resources to find practically anything you are seeking and them some, but when it finally comes time to pull the trigger... (insert confused face here).

Since there's nothing substantial on the progress report today, I thought I'd share some of my ideas for one of the more significant "wish list" items on the re-modern list, and see what you guys think. So go ahead, comment away.

Today's Item: FLOORING

The flooring will be shared between the living room, kitchen, and dining room areas, extending itself down the short hallway towards the two back bedrooms. With just around 600 sq. ft to work with I thought the best idea would be to stick with one flooring material and not disturb the flow from one area to the next. Each of the 3 bedrooms and 2 bathrooms are on their own for now since my goal is for each of these rooms to have their own identity.

1) Break the bank with Terrazzo floors.
While this would be my first choice if money were no object, the fact of the matter is that it is. Over the phone quotes have placed the price somewhere between $20 - $45 per sq. ft. which serves as no surprise to the fact that it's commonly seen in high end contemporary homes, designer hotel lobbies, and museums.


The draw for me is the cleanliness, durability, and wow factor it can bring to a space.
But does it really suit a single family home?
The draw back, besides the astronomical price, is that it's as hard as a rock, can be very cold, and yeah, that price thing again. My sensible side throws this idea out the window thinking that it's also an upgrade that will NEVER suit the price point for this home, bringing back less than 20% of the original investment. Did I mention that my sensible side is named Liz ?

2) Max out the budget with a custom Bamboo floor.
Who doesn't love bamboo? It seems to be one of the more popular "green" flooring options around, it's sturdy & durable, has an amazingly attractive grain pattern, and the price is very much right for this project, ranging anywhere from $2 - $10 per sq. ft. Just like hardwood, it's available in tons of different options and the installations are all pretty standard (meaning we wouldn't have to move out of the house for a week as I would with the Terrazzo).


My only problem, I fell in love with one of the most expensive options I have seen.


I'm just not easily satisfied with a typical "natural", "mocha" or "java" shades that can be found between $2-$4, not even the more exotic "marble" or "tiger" patterns in the $3-$5 range. I happened to stumble upon a color called "steel grey" that comes in a wide plank design and is more intended for commercial applications, although I think it would look amazing with the natural sunlight and shadow effects that these Cliff May homes provide. At $10 a sq. ft it definitely maxes out the budget, and again would not bring back a full return on the investment when it's time to sell, but even my sensible side lets this fall into the "well, i guess, if you really love it" category, leaving it a very strong possibility.

3) Play it safe with Cork, but mix in some random color here and there.

If you haven't noticed by now, I'm not really one to "play it safe", so the description above is a little misleading. While the price falls into the play it safe category, the installation and selection of styles and colors doesn't necessarily have to.


Cork has a lot of great benefits such as its warmth and soft feeling under your feet, and when installed properly it has a durability and ease of maintenance that rivals any of the previous options. Unfortunately it does have two negative traits that are leaving me undecided about this option.

The first is that it is more susceptible to fading under direct sunlight than other flooring materials. There are window films than can block UV and help protect the floors, but with the amount of glass through out these rooms this treatment needs to be added to the total cost of the job. The second is that being a softer material, installation can be a challenge for even seasoned professionals. You can't "float" cork over other flooring materials, and even with a cement slab base you must be sure that there is no unevenness or irregularities in the surface or these will translate through the flooring material.

The benefit for my creative side is that there are hundreds of colors and styles, and the installation process allows me to "mix it up" and infuse color splashes at random around the rooms. Overall it would be the least expensive option of the three and I can possibly be satisfied with the final fit and finish while also keep my sensible side smiling.